CD Storage FAQ
- What happened to the DiscSox Classic sleeve?
- What should I do with the jewel cases?
- What should I do with the "back cover"/spine/tray-card, inside the Jewel Case?
- Why are booklets difficult to insert into new sleeves once the CD is inserted?
- Will dust get into the opening where the CD isinserted?
- Can I store Double Albums?
- How do I efficiently re-file a CD in a large collection?
- How do I store DVD-Audio discs that come in a Super Jewel Box PLUS?
- How do I store J-Cards, the artwork that comes in a CD-Single?
1. What happened to the Classic sleeve?
The DiscSox Clssic sleeve has been discontinued. The new Standard sleeve is a direct replacement and provides all storage features of the Classic. Like the original Classic sleeve, the Standard sleeve is manufactured from environmentally friendly Polypropylene. Click here for more details.
2. What should I do with the jewel cases?
Please recycle the jewel cases, give them to charity, and use them as a tax write-off or have a yard sale. Jewel cases break all the time, and there will be plenty of buyers.
If you cannot recycle locally, please mail your JewelCases to:
Plastic Recycling, Inc.
2015 S. Pennsylvania
Indianapolis, IN 46225
Phone: (317)780-6100
3. What should I do with the "back cover"/spine/tray-card inside the Jewel Case?
The DiscSox CD Pro sleeve accommodates all parts of the CD including the back cover.
With DiscSox Standard and DiscSox Data sleeves the back cover will fit into the DiscSox behind the CD once it has been trimmed or folded to the same size as the back panel. In most cases however all the information is available on either the CD or in the booklet. By keeping the back covers in a place other than the CDs, they will serve as insurance company proof of purchase in case your CDs get stolen.
4. Why are booklets difficult to insert into new sleeves once the CD is inserted?
Insert the booklet before you insert your CD. After a couple of days, the DiscSox sleeve will adjust to the thickness of the booklet and the CD, making access to either one very easy.
5. Will dust get in the opening where the CD is inserted?
Given the booklet is inserted correctly, no dust will get into the DiscSox because the opening is on the right hand side. If you insert the booklet such that the opening is on the top, please rotate the booklet otherwise, dust may get into the DiscSox. Since some of the booklets are not perfectly square you may have a hard time inserting them if the opening of the DiscSox is on the top.


6. Can I store Double Albums?
DiscSox sleeves are designed to hold up to 2 CDs per sleeve; thus, double albums can be stored in one single sleeve. Make sure that the playing surface of the CDs is always facing the protective fabric in the DiscSox.
7. How do I efficiently re-file a CD in a large collection?
Because the DiscSox sleeves are not attached to the tray, re-filing is as easy as with a regular card-file. Whenever you take a CD/DVD out of your collection, replace it with a DiscSox divider (e.g. marked with a red dot). Using the divider as a marker you will always know exactly where to put the CD/DVD when you re-file it. This method will keep your CDs/DVDs always perfectly in order, either alphabetically or by category. This is one of the many benefits of DiscSox, that sets it apart from other storage systems where you have to remove all existing CDs/DVDs in order to make room for new ones.
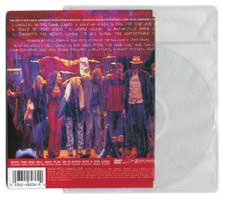
8. How do I store DVD-Audio discs that come in a Super Jewel Box PLUS?
Use the DiscSox DVD Pro sleeve which will hold up to 2 Audio DVDs, the booklet and tray-card without having to make any folds to the tray-card.
The other option is to use the DiscSox CD Pro to store the booklet and tray-card (which are both bigger than the ones for regular CDs). Just us the CD Pro sleeve "backwards" and insert the booklet into what is normally the rear pocket. If you want to store the tray-card, fold along the already existing creases and make one additional fold as indicated below.
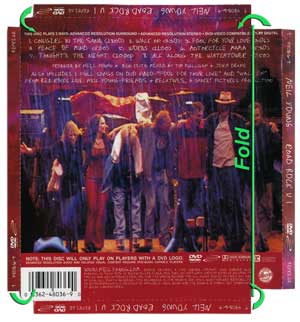
<- To store tray-card, fold small tabs and large tab as indicated by green arrows
Insert folded tray-card into rear pocket of CD Pro Sleeve ->
Insert Booklet into rear pocket of CD Pro Sleeve ->
Insert up to 2 music DVDs into front pockets ->
9. How do I store J-Cards, the artwork that comes in a CD-Single?
Use the DiscSox CD Pro sleeve "backwards" and insert the booklet into what is normally the rear pocket. No extra folds to the artwork are required.

 <- To store J-Card, fold small tab on the left back as indicated by green arrows. Note that J-cards are already pre-folded that way.
Insert folded J-Card into rear pocket of CD Pro Sleeve ->
Another option is to fold the J-Card twice as indicated below. This is an additional fold that will allow you to insert J-Cards 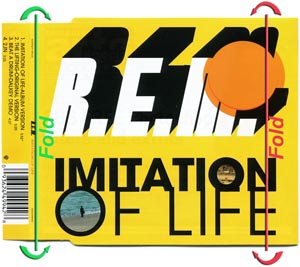 in "landscape" orientation into the front pocket of any DiscSox Sleeve.

<- Make additional fold on the right as indicated by the red arrows.
Insert folded J-Card into front pocket of any DiscSox Sleeve ->